Your machine stops working, and the culprit is a small valve. Now you face a choice: repair it or replace it? The wrong decision could lead to more problems.
Yes, you can repair a solenoid valve, but replacement is often the better choice. For minor issues like a faulty coil1 or simple cleaning, a repair is cost-effective. However, if the valve body is damaged, the unit is old, or it's a critical safety component, replacement is safer and more reliable.

Making the right call between repairing and replacing a solenoid valve can save you time, money, and future headaches. As someone who has been in the solenoid business for over 20 years, I've seen it all. To help you make an informed decision, we need to break the problem down. It starts with understanding how these simple but crucial devices work. Let's dive in and look at the details so you can choose with confidence.
How Do Solenoid Valves Actually Work?
Ever wondered what's inside that little box controlling the flow of water or air? It might seem complex, but the idea is simple. Understanding it is the first step.
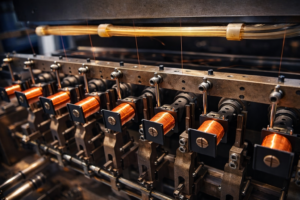
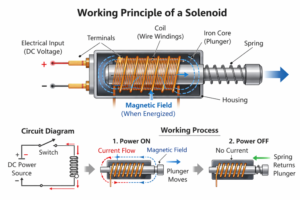
A solenoid valve uses an electric current2 sent through a coil to create a magnetic field3. This magnetic field3 moves a metal plunger, which opens or closes an orifice. This action controls the flow of liquid or gas through the main valve body. It's an electromechanical switch4.
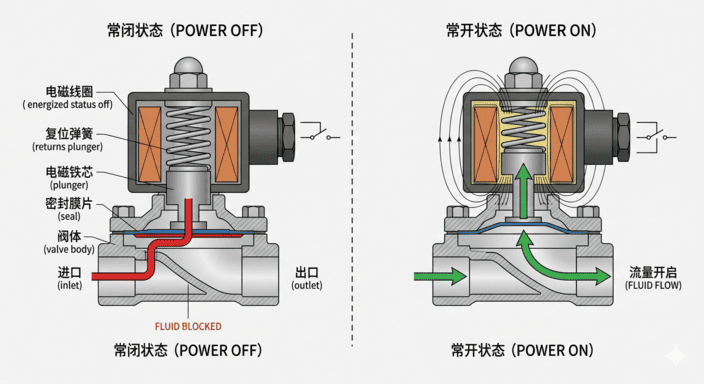
I remember the first time I took one apart. I was surprised at how few moving parts there were. At its core, a solenoid valve is made of two main parts: the solenoid (the coil and plunger) and the valve body. When you send power to the coil, it becomes an electromagnet. This pulls the plunger up or pushes it down, overcoming a small spring. This movement is what opens or closes the valve. There are "Normally Closed5" (NC) valves, which are closed until you power them, and "Normally Open6" (NO) valves, which are open until you power them. Most valves in home appliances, like washing machines, are Normally Closed5.
Here’s a simple breakdown of the key components:
| Component | Function |
|---|---|
| Solenoid Coil | A copper wire winding that creates a magnetic field3 when energized. |
| Plunger (Armature) | The magnetic metal rod that moves inside the coil. |
| Spring | Returns the plunger to its resting position when power is off. |
| Valve Body | The housing with an inlet and outlet for fluid to pass through. |
| Seal/Diaphragm | A rubber or plastic part that the plunger presses against to stop flow. |
Understanding this simple mechanism makes troubleshooting much easier.
What Are the Telltale Signs of a Failing Solenoid Valve?
Your appliance is acting strange, but you aren't sure why. The symptoms can be confusing, but knowing the signs of a failing solenoid valve will point you straight to it.
Common symptoms include the valve not opening or closing7, making a loud humming noise8, leaking fluid, or operating too slowly. Sometimes, the coil can overheat and burn out9, which you might be able to smell. These are clear signs of an internal issue that needs your attention.
Over the years, my team and I have seen thousands of failed valves. The symptoms almost always fall into a few categories. A valve that won't open is a classic. This could be a dead coil, no power getting to the coil, or debris physically blocking the plunger. On the other hand, a valve that won't close completely is often caused by debris stuck under the seal or a worn-out seal that can no longer create a tight closure. If you hear a loud buzzing or humming, it's often due to incorrect voltage or low water pressure causing the plunger to vibrate. A visible leak is the most obvious sign, and it almost always points to a degraded or torn diaphragm or seal.
Here's a table to help you connect symptoms to their likely causes:
| Symptom | Potential Cause(s) |
|---|---|
| Valve does not open | Burnt-out coil, no power, wrong voltage, blocked orifice. |
| Valve does not close | Debris in the valve, worn seal/diaphragm, weak return spring. |
| Loud humming/buzzing | Incorrect AC voltage, low pressure, worn plunger. |
| External leak | Damaged valve body, worn-out seals. |
| Slow operation | Low voltage, dirt or grime restricting movement. |
Identifying the symptom is the first step in your diagnosis.
When Does Repairing a Solenoid Valve Make Sense?
You don't want to waste money on a new valve if you don't have to. But a botched repair can be even more costly. Here’s how you know when a repair is smart.
Repair is a good option for minor, easily fixable issues. This includes a burnt-out coil, a dirty filter, or a stuck plunger that just needs cleaning. If you can get the right replacement parts and the total cost is much less than a new valve, go for it.
In my experience, a repair is the right move when the problem is isolated to one component. The most common repair I see is a simple coil replacement. Since my company, SolenElec, manufactures these coils, I know they are designed to be replaceable components. If the valve body is in good shape and the only issue is a dead coil, swapping it out is a quick and cheap fix. The same goes for cleaning. Sometimes, a valve just gets clogged with sediment or debris. Disassembling it, cleaning the parts, and putting it back together can make it work like new. This is especially true in systems with hard water. If a manufacturer offers an official repair kit with new seals and a diaphragm, that’s also a strong signal that the valve is designed to be serviceable. Repairing makes sense when the valve is in a non-critical, low-pressure system and you have the time to do the job right.
When Is Replacing the Solenoid Valve the Only Option?
You tried a quick fix, but the problem is still there. Continuing to patch up a failing valve can lead to bigger disasters, like a major leak. You need to know when to replace it.
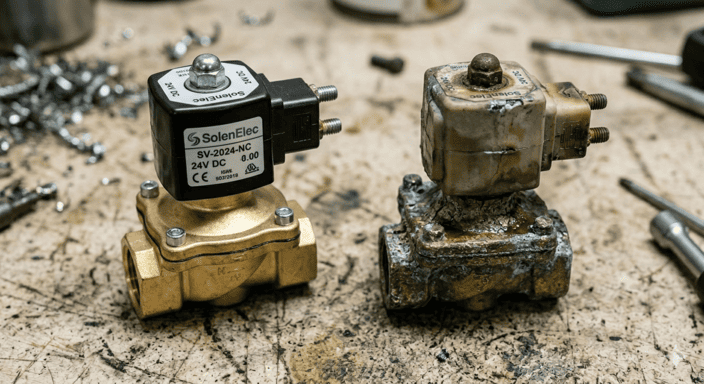
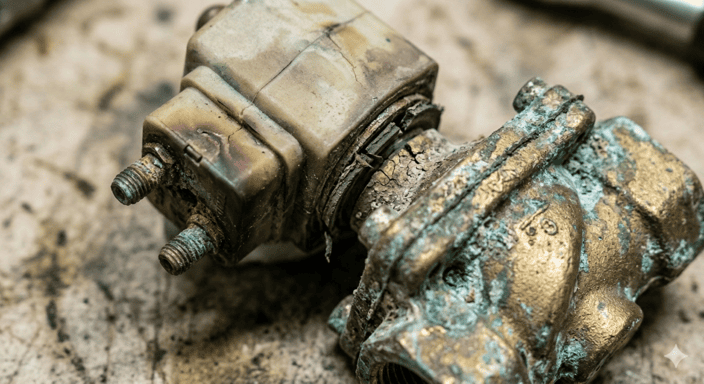
You must replace a solenoid valve10 when the valve body is cracked or damaged, the valve is very old, or it's in a critical safety system. If a repair is almost as expensive as a new valve, replacement is the more sensible and reliable long-term solution.

Some situations are non-negotiable. If you see a crack in the plastic or brass valve body, replace it immediately. A repair won't hold, and it's a flood waiting to happen. Age is another huge factor. If a valve is over 10 years old, its internal parts like the diaphragm and spring have likely become brittle and weak. Fixing one part today often means another will fail tomorrow. I always use the example of a washing machine inlet valve. A technician's visit to repair the valve might cost you a significant fee. For a little more, you can get a brand-new valve assembly. This gives you peace of mind and prevents a second service call when another part of the old valve fails. Most importantly, for any valve used in a high-pressure system or with flammable gas, you should never take a risk. A failure there could be catastrophic. For our industrial clients, replacement is standard practice to ensure safety and operational reliability.
How Can You Diagnose and Clean a Solenoid Valve Yourself?
You think the solenoid valve is the problem. But opening it up without a plan can make things worse. Following these simple steps will ensure a safe and effective diagnosis.
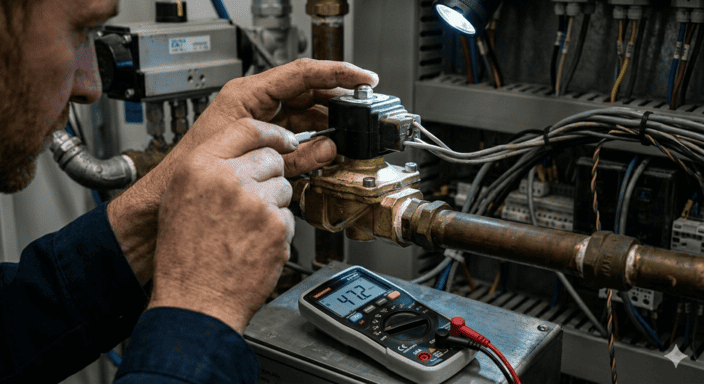
First, always disconnect the power and shut off the fluid supply. Check for power at the coil with a multimeter. If the coil seems fine, carefully take the valve apart. Look for debris, worn seals, or a damaged diaphragm. Clean all parts gently and reassemble.
Here is a step-by-step process I recommend to anyone who wants to tackle this themselves. I’ve used this process countless times on the factory floor and at home.
- Safety First. This is the most important step. Turn off the electricity to the machine at the breaker. Shut off the water or gas supply line leading to the valve and relieve any pressure in the system.
- Electrical Check. Set your multimeter to AC or DC volts11 and carefully check the terminals while the machine is supposed to be activating the valve. If you get the correct voltage (e.g., 120V AC, 24V DC), the problem is likely mechanical. If not, the problem is upstream. Next, check the coil's resistance (with the power off). An infinite reading means the coil is burnt out.
- Disassembly. Carefully unscrew the coil and then the valve body. Pay close attention to how everything fits together. I suggest taking a few photos with your phone as you go.
- Inspection. Look inside. Is there grit or scale blocking the tiny orifice? Is the rubber diaphragm torn or brittle? Is the spring broken?
- Cleaning. Use a soft cloth or a small brush to gently clean all the internal parts. Don't use anything sharp that could scratch the surfaces.
- Reassembly. Carefully put everything back in the reverse order you took it apart. Make sure all seals are seated perfectly to prevent leaks.
- Test. Turn the supply and power back on and test for function and leaks.
Still Unsure? Use This Checklist to Decide Between Repair and Replacement?
You've diagnosed the problem, but the choice isn't obvious. Making the wrong decision can be frustrating and expensive. This simple checklist will remove the guesswork for you.
Use this checklist to weigh the factors. Think about the cost of parts versus a new valve12, the availability of those parts13, the age of the valve, and any safety risks14. If "Replace" has more checkmarks, especially for safety, that's your answer.

As a manufacturer supplying major brands, we think about this constantly. Our clients, who are procurement managers, need to protect their brand's reputation. A failed valve in a customer's home reflects poorly on them. That’s why we often advise that replacement is the best policy for finished goods. It eliminates risk. For your own projects, this checklist can help you think like a pro and make the best long-term decision. Go through each row and see which column better describes your situation. Be honest, especially about the cost of your own time.
| Factor | Consider Repair If... | Consider Replacement If... |
|---|---|---|
| The Fault | The coil is burnt, or the valve is just dirty. | The valve body is cracked or corroded. |
| Cost | Parts are less than 50% of a new valve's cost. | The repair cost is close to the replacement cost. |
| Age | The valve is relatively new (under 5 years old). | The valve is old and near its expected end-of-life. |
| Part Availability | You can easily find an OEM repair kit or coil. | Parts are obsolete or must be special ordered. |
| Safety | It's a low-pressure, non-critical application (e.g., garden sprinkler). | It's a high-pressure, gas, or critical safety system. |
| Downtime | You can afford the time to diagnose and repair it yourself. | You need a quick, reliable, and guaranteed fix right now. |
Conclusion
Deciding between repair and replacement is simple. Minor issues favor repair, but for safety, severe damage, or long-term reliability, always choose to replace the valve for peace of mind.
Understanding the causes of a faulty coil can help you decide whether to repair or replace, ensuring efficient and cost-effective maintenance. ↩
Understanding how electric current activates solenoid valves helps you troubleshoot and decide on repair or replacement options effectively. ↩
Understanding the magnetic field in solenoid valves helps you grasp their operation, aiding in troubleshooting and making informed repair or replacement decisions. ↩
Understanding electromechanical switches helps grasp solenoid valve operations, enhancing your ability to diagnose and fix issues effectively. ↩
Understanding Normally Closed solenoid valves helps you choose the right type for your appliance, ensuring efficient operation and preventing malfunctions. ↩
Understanding Normally Open valves helps you choose the right type for your appliance, ensuring efficient operation and preventing unnecessary repairs. ↩
Find out the common causes of a solenoid valve failing to open or close, aiding in effective troubleshooting. ↩
Learn about the reasons behind a solenoid valve producing a loud humming noise to address the issue promptly. ↩
Understand the factors leading to coil burnout in solenoid valves to prevent and address this common issue. ↩
Determine the situations where replacing a solenoid valve is the only viable option for safety and reliability. ↩
Learn how to use a multimeter to diagnose electrical issues in a solenoid valve for accurate troubleshooting. ↩
Evaluate the cost-effectiveness of repairing a solenoid valve by comparing parts costs to a new valve purchase. ↩
Understand how the availability of parts influences the decision to repair or replace a solenoid valve. ↩
Identify potential safety risks linked to solenoid valve failures to prioritize replacement when necessary. ↩